

Getting the right ring size can be the difference between a perfect fit and an awkward return.
In this guide you'll learn how to size a ring accurately, step by step, so you never have to guess again.
First, grab a piece of string or a strip of paper. Wrap it snugly around the base of the finger you plan to wear the ring on, mark where the ends meet, then lay the strip flat and measure the length with a ruler.
Next, compare that measurement to a standard ring size chart. Remember that temperature matters—your hands shrink in the cold, so measure when your skin feels warm.
For a quick sanity check, try a ring you already own that fits well. Slide it onto the finger; if it slides on with a little wiggle, you’ve hit the sweet spot.
At Cervin Blanc we suggest confirming the size with a jeweller before ordering a custom piece. A professional can double check the measurement and advise any needed adjustments.
Follow these simple steps and you’ll walk away confident that your new ring will sit just right, whether it’s an engagement band or a delicate stackable piece.
Step 1: Measure Your Finger with a Ring Sizer
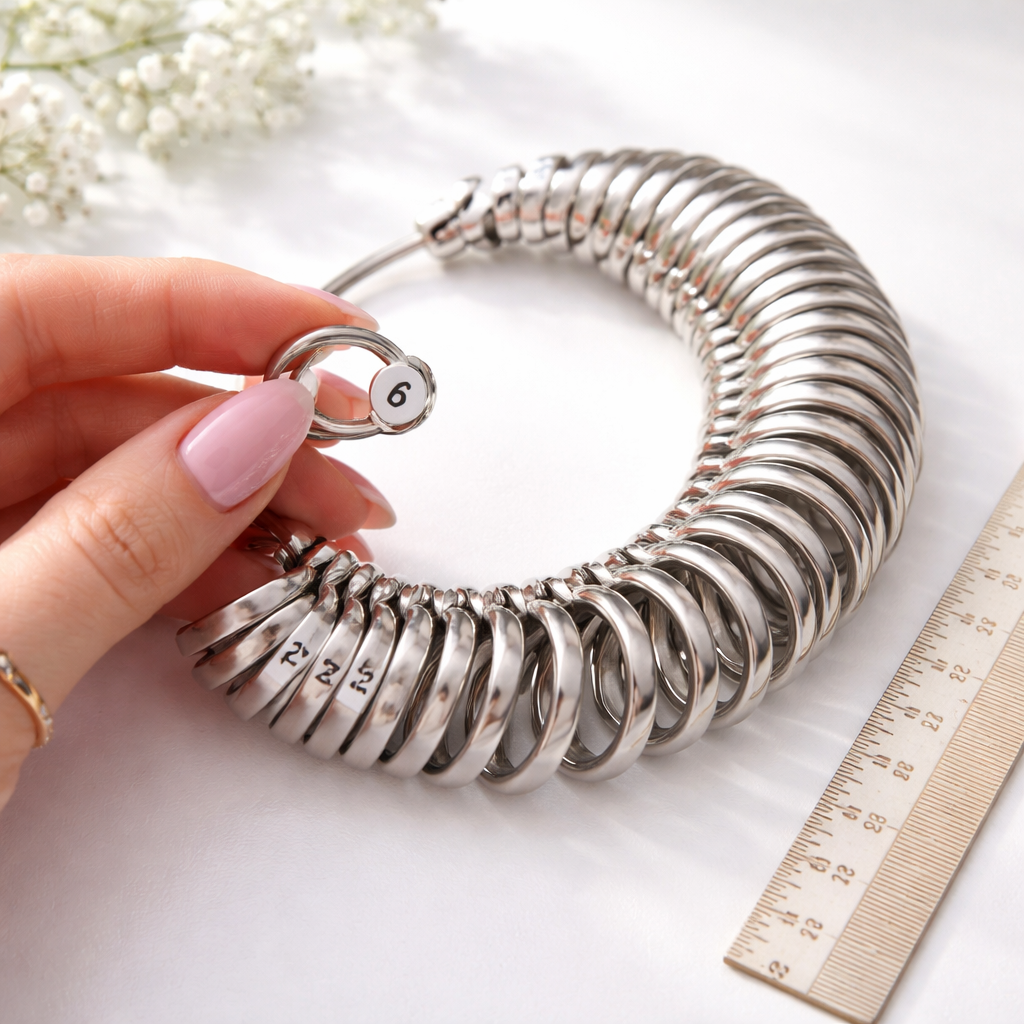
First thing you need is a ring sizer. You can buy a plastic set online or ask a jeweller for a metal one. It feels like a tiny set of rings, each marked with a number.
Slide the sizer onto the finger you plan to wear the band on. Make sure it sits just above the knuckle, where the ring will rest. You want a snug fit – it should move a tiny bit, but not spin around.
If the sizer feels too tight, drop down one size. If it feels loose, go up. The right size feels like a gentle hug.
Tip: measure at the end of the day when your hand is warm. Cold fingers shrink and can give a false reading.
Once you find the perfect size, write it down or snap a photo of the sizer. That number is what you’ll use when you order a custom piece or pick a ready‑made ring.
Need a quick visual guide? Check out the short video below – it walks you through the same steps in under two minutes.
Remember, a good fit means comfort and confidence. If you’re still unsure, bring the sizer to a local jeweller. They can double‑check the measurement and advise if you need a slight adjustment for a band that sits lower on the finger.
When you’re happy with the size, you’re ready to move on to the next step: choosing the style that matches your personality.
Step 2: Use a Printable Ring Size Chart
Now that you have a number from the sizer, you need a way to turn that millimetre count into a ring size. A printable chart does exactly that.
First, download a PDF chart from a reputable jeweller. Print it on plain paper, not glossy photo paper, so the holes line up correctly. If the printout looks too small, print a test page and measure a known ring to double‑check the scale.
Next, lay your ruler next to the chart. Find the line that matches the millimetres you noted (for example, 54 mm). The chart will show the corresponding size, often a half‑size like 7.5.
Here’s a quick scenario: imagine you measured 58 mm on your right hand. You glance at the chart, see 58 mm aligns with size 9, and note that down. When you order a Swiss‑made engagement band from Cervin Blanc, you’ll type “9” into the size field.
Tip: keep a spare copy of the chart in your jewellery box. If you try on a new band later, you can quickly verify the fit without re‑measuring.
Sometimes a chart shows both US and European sizes. If you’re in the United Kingdom, pick a size that matches the UK system. A common mix‑up is reading the US column by mistake, that can add a full size.
Finally, double‑check the printed numbers. Use a second ruler or a phone’s measurement app to confirm the millimetre line isn’t off by a fraction. A half‑size error can feel tight or loose.
When you’re happy with the printed result, you’ve got a solid reference for any online order. The next step is to confirm the fit with a jeweller before you buy.
Step 3: Try the Ring Sizer Tool at Home (Video)
Now it's time to see the tool in action.
Grab the printable ring-size chart you just printed and cut out the little plastic sizer that comes with it.
Place the sizer on the finger you measured, making sure it slides on easily but doesn't spin.
If the sizer feels tight, pull it a tiny bit until you get a comfortable wiggle.
Watch the short video below, it walks you through each move step by step.
Notice how the sizer sits flush against the skin and how the video shows the exact point to read the millimetre line.
Pause at the moment the ruler aligns with the notch, then write down that number before you lose focus.
A quick tip: do this on the hand that’s warm, like after you’ve held a cup of tea, because warm skin gives a truer fit.
Once you have the millimetre reading, flip back to your chart and match it to the size column that fits your region, US, UK or European.
Double-check by sliding a ring you already own onto the finger; if it feels the same, you’re good to go.
If anything feels off, repeat the video steps with a fresh sizer – the extra few seconds now save you a costly return later.
Step 4: Verify Size with Multiple Methods
One read of the millimetre line is nice, but a single check can still hide a mistake. That’s why you should confirm your size with at least two different ways before you click “order”.
First, use the plastic sizer again, but this time press it gently against the skin and note where the inner edge sits. Then, take a strip of paper or string, wrap it the same way and measure the length with a ruler. If both readings land in the same half‑size, you’re probably good.
Second, try a known ring that fits well. Slide it onto the finger you measured, then measure that ring on the sizer or with a caliper. If the ring’s size matches your chart, you have a double check.
What if the numbers differ? Imagine you got 54 mm on the sizer but the paper strip shows 55 mm. In that case, pick the larger reading – a snug ring feels better than a tight one that can cut off circulation.
Another quick trick is to use a phone app that reads a printed ring‑size chart. Hold the phone over the chart, line up the guide line, and note the size the app suggests. It’s a handy backup when you’re away from a jeweller.
Finally, give a local jeweller a quick call. Many will confirm your size over the phone if you tell them the millimetre number and the band width you plan to use.
Quick comparison of methods
| Method | Tool | Tip |
|---|---|---|
| Plastic sizer repeat | Disposable plastic loop | Take the larger reading if they differ |
| Paper or string | Thin strip & ruler | Measure on a warm hand for true fit |
| Existing ring check | Your own well‑fitting ring | Use a caliper or sizer to read its size |
When you finish these checks, write the final number down and keep it with your jewellery notes. That way you’ll walk into any Swiss or UK jeweller with confidence, and you’ll avoid the dreaded return.
Step 5: Adjust and Finalize the Fit
Now that you have a number, it’s time to fine‑tune the fit so the band feels just right all day.
First, slide the ring over your knuckle. It should meet a tiny bit of resistance, not a tight pinch. If it feels like it’s stuck, you’re probably a half‑size too small. A comfortable push‑over tells you the ring will sit snug on the base of the finger. Many jewellers say this little resistance is a good sign.
Second, think about everyday life. Warm water, a long walk, or a glass of wine can make fingers swell a touch. Try the ring after a short walk or while holding a warm mug. If it still feels loose, add a half‑size. If it feels tight, stay at the lower number.
Third, make minor tweaks before you order. A common fix is to add tiny “sizing beads” inside the band. They act like a small speed bump that stops the ring from sliding. Harper Tait explains how these beads work. If the band is wide, you might need to go up a full size instead of a half.
Fourth, record the final size on a piece of jewellery paperwork or in a notes app. Write down any adjustments you made – beads, extra half‑size, or a custom shank shape. This record saves you from guessing when you visit a Swiss jeweller or order online.
Pro tip: ask the jeweller to check the ring on both hands. One hand can be a millimetre larger, and the larger reading usually feels safer for a wedding band.
Conclusion
Now you know how to size a ring accurately, from the first wrap of a string to the final check with a jeweller. A snug fit feels like a gentle hug, not a tight grip.
Before you click “order”, try the ring on a warm hand after a short walk. If it still moves, add a half size bead inside. If it feels tight, stick with the lower number.
Need more guidance on choosing the right setting for your engagement band? Check out The Complete Engagement Ring Settings Guide for 2026 for style tips that match your perfect size.
And don’t forget the little details that make your wedding day run smooth, like good food and drinks. Classiqaz Stores offers premium UK snacks and drinks that pair well with a Swiss made ring ceremony.
Take these steps, write down your final size, and step into the jeweller with confidence. Your ring will sit just right.
Frequently Asked Questions
How can I measure my finger at home without a ring sizer?
Grab a thin strip of paper or a piece of string. Wrap it snugly around the base of the finger you plan to wear the ring on, just like a gentle hug. Mark the point where the ends meet, then lay the strip flat and measure the length with a ruler in millimetres. Compare that number to a size chart to find your size.
What temperature should I consider when sizing a ring?
Warm hands expand a bit, cold hands shrink, so you’ll get the most reliable reading when your skin feels comfortable. Aim for a time after you’ve had a cup of tea, a short walk, or a few minutes in a room‑temperature space. Avoid measuring right after a shower or in a chilly car, as the result may be a size too small.
Is it better to size my ring on my dominant or non‑dominant hand?
Most people find the finger on their non‑dominant hand is a touch larger because that hand does more work. Measure both hands and note the larger number; the ring will feel more comfortable on the hand you’ll wear it on. If the two readings differ by more than a millimetre, go with the bigger size.
How many millimetres difference does a half‑size make?
A half‑size shift changes the inner circumference by about 1.25 mm, which is roughly the width of a thin pencil line. That small gap can be the difference between a ring that slides off and one that sits snugly. When your measurement lands halfway between two full sizes, round up to the next half‑size for a secure fit.
Can I rely on a printable ring size chart for UK sizes?
A printable chart works well if you print it on plain paper and check the scale with a ruler. First, measure a ring you already own, then compare that measurement to the printed circles. If the circles line up, the chart is accurate for UK sizes. Keep a spare copy in your jewellery box for quick checks later.
What should I do if my measurement falls between two sizes?
When your reading sits between two sizes, most jewellers suggest choosing the larger one and adding a tiny sizing bead inside the band if needed. The bead acts like a small stop that keeps the ring from slipping. You can also ask the jeweller to file the inner edge slightly, but only a professional should do that.